

All the elements that appear on the screen of an Android application are views. From individual elements such as texts or buttons, to containers such as groups of views. This topic is quite complex due to the amount of details involved, and to explore the available possibilities in more depth, it is highly recommended to go to the official documentation. In this tutorial we will analyze the most used elements, including groups of views and some basic elements.
View Groups
- LinearLayout
- Groups the elements in a single line, which can be vertical or horizontal.
- RelativeLayout
- The elements are arranged in relation to each other and the margins. It is the most flexible, and the most used.
- scrollview
- It is used for views that do not fit on the screen. It can only contain one view or group of views, and automatically adds scroll bars.
- TableLayout
- Group items into rows and columns. It contains TableRow elements, which in turn contain the elements of each cell.
- frame Layout
- It is intended to contain a single view. If more are added, they all line up in the upper left corner, overlapping.
- AbsoluteLayout
- It is deprecated since Android version 1.5. In this container, elements are referenced with absolute coordinates starting from the upper left corner. It has been deprecated because it does not adapt to screens of different sizes, which became popular just as of Android 1.5.
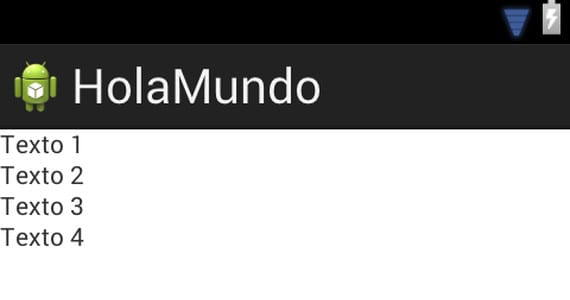
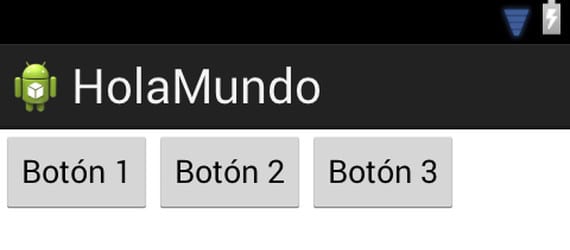
For a simple application, the most interesting groups to see in detail are LinearLayout, RelativeLayout, and ScrollView. For example, we can make a LinearLayout vertical containing texts, and another horizontal with buttons:
[html]
<LinearLayout xmlns:android="http://schemas.android.com/apk/res/android"
android: layout_width = "match_parent"
android: layout_height = "match_parent"
android: orientation = "vertical">
<TextView
android: id = "@ + id / textView1"
android: layout_width = "wrap_content"
android: layout_height = "wrap_content"
android: text = "Text 1" />
<TextView
android: id = "@ + id / textView2"
android: layout_width = "wrap_content"
android: layout_height = "wrap_content"
android: text = "Text 2" />
<TextView
android: id = "@ + id / textView3"
android: layout_width = "wrap_content"
android: layout_height = "wrap_content"
android: text = "Text 3" />
<TextView
android: id = "@ + id / textView4"
android: layout_width = "wrap_content"
android: layout_height = "wrap_content"
android: text = "Text 4" />
[/ html]
[html]
<LinearLayout xmlns:android="http://schemas.android.com/apk/res/android"
android: layout_width = "match_parent"
android: layout_height = "match_parent"
android: orientation = "horizontal">
<Button
android: id = "@ + id / button1"
android: layout_width = "wrap_content"
android: layout_height = "wrap_content"
android: text = "Button 1" />
<Button
android: id = "@ + id / button2"
android: layout_width = "wrap_content"
android: layout_height = "wrap_content"
android: text = "Button 2" />
<Button
android: id = "@ + id / button3"
android: layout_width = "wrap_content"
android: layout_height = "wrap_content"
android: text = "Button 3" />
[/ html]
Una scrollview It can be composed very easily, you just have to wrap the container that you have to write:
a
android: layout_height = "fill_parent"
xmlns: android = "http://schemas.android.com/apk/res/android"
<...>
[/ html]
<RelativeLayout
xmlns: android = "http://schemas.android.com/apk/res/android"
android: layout_width = "match_parent"
android: layout_height = "match_parent">
<Button
android: id = "@ + id / button1"
android: layout_width = "wrap_content"
android: layout_height = "wrap_content"
android: layout_alignParentLeft = "true"
android: layout_alignParentTop = "true"
android: text = "Button 1" />
<Button
android: id = "@ + id / button2"
android: layout_width = "wrap_content"
android: layout_height = "wrap_content"
android: layout_alignParentRight = "true"
android: layout_alignParentTop = "true"
android: layout_toRightOf = "@ + id / button1"
android: text = "Button 2" />
[/ Html]
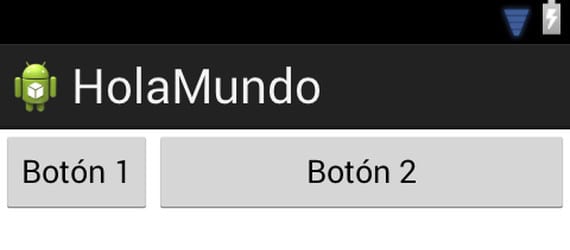
In this example, the first button aligns with the left and top margins of the container, and button 2 aligns with the top, right, and right margins of button 1.
Views
- TextView
- Displays a fixed text.
- edittext
- Contains editable text.
- Button
- Simple button.
- ImageButton
- This button allows you to display an image instead of a text
- ToggleButton
- Button that can maintain its pressed state until it is pressed again.
- CheckBox
- Button similar to ToggleButton that works as a check box.
We have seen before how a TextView works, since it only has to include text. In the official documentation we can find more advanced options such as varying the font, text size, color, and many more.
Buttons are of more interest, since somehow we have to associate an action with them. We are going to see two ways. In one, we directly associate the action in the code of our activity:
Button button = (Button) findViewById (R.id.button1);
button.setOnClickListener (new View.OnClickListener () {
public void onClick (View v) {
DisplayToast ("You pressed the button");
}
});
[/ Html]
Here the key is the id that we have given to the element in the XML file, we need it to locate it in the code. With it, we can associate the action we need. Another alternative would be to include the element "android: onClick =" btnClicked "in the button XML, and then add the method with the indicated name directly to the activity code:
[html]
public void onClick (View v) {
DisplayToast ("You pressed the button");
}
[/ Html]
For a CheckBox or a ToggleButton we can do something similar to the first method. We obtain the reference through findViewById, and apply the following fragment:
[html]
button.setOnCheckedChangeListener (new OnCheckedChangeListener () {
@Override public void onCheckedChanged (CompoundButton buttonView, boolean isChecked) {
if (isChecked) DisplayToast ("You have activated the button");
else DisplayToast ("You have disabled the button");
}
});
[/ Html]

Hello bitches my name is the goat
I want to fuck with Ivan
What a nice neighborhood what a nice neighborhood is the nigga's neighborhood won't be worth a penny but it's muddy
I want to fuck with the chuy
How do I install an apk? Urgent!!
You take the apk file and copy it to the sdcard or internal memory of the terminal in which you decide to install. Then, with any file explorer you enter the path where you have pasted it and clicking on it will run automatically. If it returns a little window with a button that puts settings, you must click on it to activate the permissions to be able to install applications from unknown sources.
Mr. What is the meaning of Android symbology?
L
YOUR GFA HAS A 20-meter PITOTE and THE CHIVA eats it up
the part that says
public void onClick (View v) {
DisplayToast ("You pressed the button");
}
should be
public void btnClicked (View v) {
DisplayToast ("You pressed the button");
}