Well today I write you a tutorial to be able to use ADB commands under Debian distributions, and by extension, Ubuntu. It will be useful for those who do not want to install Ubuntu permanently. Everything indicated below, can be done by booting a LiveCD / Live USB. Sure, that is, considering that when shutting down, all changes will be erased and to run ADB again, you will have to do the tutorial again. For For more help or suggestions, check out the post in our Forum.
A short introduction about ADB. ADB stands for Android Debug Bridge, that if we 'translate' it it would be Android Debugging Bridge. Well, this does not tell us anything a priori. They are actually a set of tools that come with the Android SDK and that allow us to take control of some functions of our terminal from our pc. That is, from updating, editing, deleting all system files (root required) to installing applications, moving files from / to the SD, etc.
First, we set the 'rules' in udev. That is, we open the console (applications / accessories / terminal) and type:
For Ubuntu:
sudo gedit /etc/udev/rules.d/51-android.rules
For Debian:
sudo su
gedit /etc/udev/rules.d/51-android.rules
In both cases we must enter our Root password to carry out the process. If you use KDE instead of Gnome, you have to replace Gedit with the text editor you use, Kate, Nano, ...
The Gedit editor will open and inside this file, we have to add the following line:
SUBSYSTEM == »usb | usb_device», SYSFS {idVendor} == »0bb4 ″, SYMLINK + =» android_adb », MODE =» 0666 ″, USER = »root»
EYE: you have to have a couple of considerations to use this line:
- IdVendor changes depending on the manufacturer. Change 0bb4 to your manufacturer's by looking at the following table:
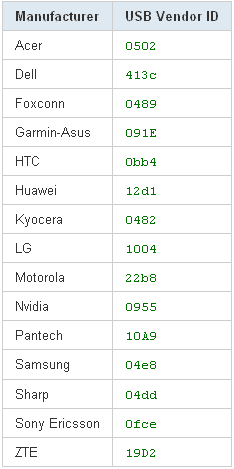
- In the User section, for Ubuntu we have to place root. In case of using Debian we will have to put the name of our user. example: USER = »so and so».
When we finish adding the line SAVE and close.
We have to restart the udev services. It can be done by restarting the computer, although it is faster:
/etc/init.d/udev restart
Now we have to download the Android SDK in the following link. We are on Linux, so that's what it takes. When the download is finished, we unzip it. I recommend doing it in your home directory. Although you can choose the Desktop or wherever you want, and adapt the tutorial routes to your decision. I'm going to use my home directory, and I've named the folder android-sdk to have less typing.
We go to Android-sdk (which we have just unzipped) and in the tools folder. Inside is a file called Android. Right button on it, we click on properties. We go to the parmisos folder, select the option "allow the file to run as a program" and close. Now double click on the file, and we give the option "run in terminal". So if there is a problem so that it does not run, it will tell us.
With Ubuntu freshly installed, I have had no problems. But it is necessary to have java installed and some libraries. If this is your case, what has given you an error:
- Install the java (Open JDK 6 in the Application Manager, Ubuntu software center).
- The necessary libraries are the following:
ia32-libs lib32asound2 lib32gcc1 lib32ncurses5 lib32stdc ++ 6 lib32z1 libc6-i386 libc6 libc6-dev
Well, we have the Android SDK and AVD Manager open. We go to option 'Available Packages' and install:
- Android SDK tools.
- Android platform tools
We let him do his thing and finish. Relax, there is little to go.
Before plugging in the phone we have to go to:
- Settings, applications, development and there select «USB Debugging» «USB Debug notify» (it is not necessary, only that it warns us) and «Simulated locations».
Now we can plug in our phone via usb, and we are going to check that it works.
We open a console (terminal) or the one from before, it helps us. We navigate with 'cd' to enter the folder where the ADB is. In my case:
cd / home / iulius / android-sdk / platform-tools
Remember, your name is not iulius, so you will have to change the lines as you have your SDK. If in doubt, close the terminal and add only:
cd / android-sdk / platform-tools
Now we execute:
./adb devices
And it has to return something like this:
* Daemon not running. starting it now on port 5037 *
* Successfully started daemon *
List of devices attached
SH0BDPL04538 device
That's it. Configured the ADB. Every time we want to do something, we repeat the steps to execute ./adb and whatever corresponds.
For the comfortable ones (I never do this step, I don't like it). They do not want to go around with cd to enter the folder. Well, we would have to go to edit our profile for bash. We open a new terminal and write:
sudo gedit .bashrc
We add at the end
export PATH = $ {PATH}: / home / YOUR_USER / android-sdk / platform-tools
export PATH = $ {PATH}: / home / YOUR_USER / android-sdk / tools
And that's it. All ready to work with ADB on our Android. There is an option to do it via WiFi with the ADB Wireless program (you need root).
Very good tutorial!
With Ubuntu I have not needed to modify the rules.d, yes, from time to time it does not recognize it well and you have to do:
sudo adb kill-server
sudo adb start-server
At the same time we uncheck and uncheck the debugging option on the mobile (after disconnection).
Thank you!
It depends on the version of ubuntu you have. The last ones do bring it.
But since the tutorial is for Debian I also had to include them XD
Good appreciation for restarting ADB services.
If the mobile is from another brand, the idVendor is removed with lsusb
It will give a list in which each line will be of the type:
Bus 005 Device 002: ID 04e8: 681c Samsung Electronics Co., Ltd Galaxy Portal / Spica Android Phone
The idVendor will be the first quartet of numbers after ID, in this case 04e8. The next nibble is the model, which you should also specify if you also connect another gadget from the same manufacturer that you don't want to control with ADB with SYSFS {idProduct} == »xxxx» (The second nibble after ID).
I have tried to do a tutorial for all audiences. With less time on the console because for non-accustomed users it is more confusing. I could also have given execute permissions to the android file with chmod but it would be even more of a hassle
Even so, all these comments are appreciated.
thanks!
I am trying to connect my Galaxy S2 in Ubuntu but it does not detect it, it tells me this:
List of devices attached
emulator-5554 device
???????????? no permissions
Any idea?
Thank you
very well thank you. In my case I just installed the libraries and it worked perfect for me. Ubuntu use of x64
Good.
I have a problem, and it is that my Energy System i828 should appear in the list of devices, with id = 2207 that I have already configured following your help, it appears blank.
I am using a LiveDVD from Ubuntu 10, where the Java JDK is already installed, and I have downloaded the Android SDK. I have performed a "service udev restart" without any problems.
The only strange thing that has appeared to me following the guide, is that when executing as you say, the "android", in the tab that appears, all the options come to me as installed, without having done anything ...
Any idea of the problem? Thank you very much in advance.